File Transfer Protocol
Hostgator Web servers
If you have a ACC student web server, use these instructions instead.
The following is an example and tutorial for using
File Transfer Protocol and the Filezilla FTP client for use
with Hostgator accounts.
-
This guide should be all you need to get started
with FTP with Hostgator, but you may also find these
Hostgator references useful.
-
In the grade center on Blackboard you will see a
column, Web Server Creds. In this column you will
see something like this: u8792225 1a(B#!6a4Ghd
which is your username and password for the Web server
(separated by one space). Don't do anything with this yet, just note it for later.
Note: The password is 12 characters long. Make sure when you get your password from Blackboard you get the whole password. Sometimes the password gets cut off if your Web browser window isn't big enough.
-
There are many ways to transfer files between your local computer
and a remote web server (you are free to use any you like), but the easiest
way is to use the FTP client
Filezilla.
If you don’t have it, you can
download
it,
install
it, and
use it.
If you do not want to use Filezilla, that’s fine,
how you upload to the server is you choice, but
Filezilla will be the tool assumed and supported in class.
Filezilla is already installed in all ACC labs, so if you use the labs, just search for Filezilla in the start menu.
-
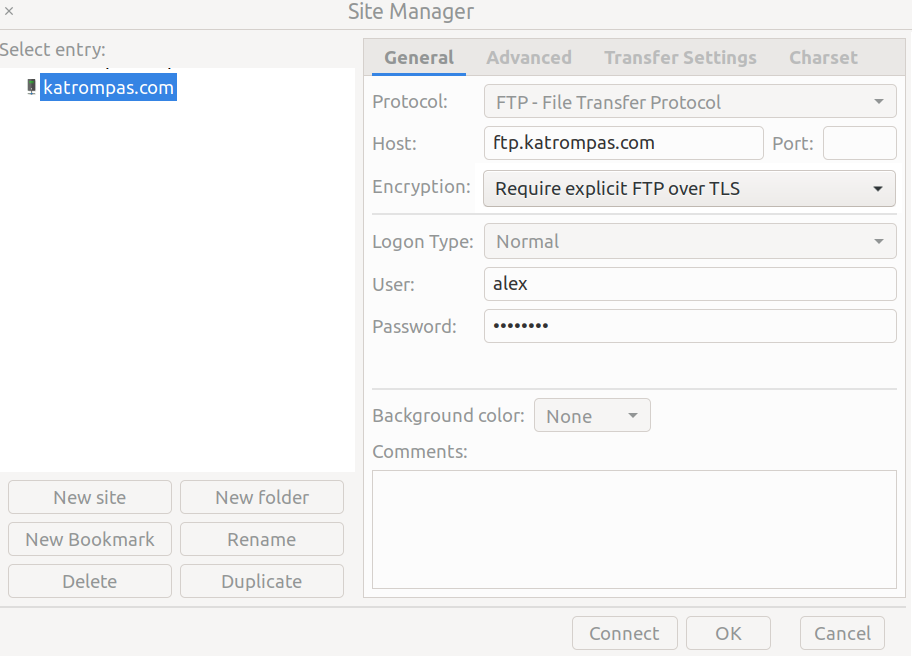
Once you have Filezilla installed and running, open the Site Manager
and set up a connection. On the main menus, choose File-->Site Manager....
Click new connection and enter your information.
It will look similar to this (below).
Name your connection anything you like. I named mine
“katrompas.com” for these instructions because that is the
name of my domain for demonstration purposes.
- Host: ftp.yourdomian.name
- Protocol: Require explicit FTP over TLS
- Username and Password: Use your username and password from Blackboard. Do not copy-paste it. Type it out manually. Copy-paste has sometimes been problematic, so you have to type it out.
-
Once you're sure you have everything set, you can click Connect,
and you will be logged into the server for FTP.
-
The first time you login you will be asked to accept a security
certificate. Choose "always trust certificate" and click OK.
-
Once you’re logged into the server, you will see your local
files on the left, and the server files on the right. It
will look something like this (below) but will not be exactly the same.
Note that the files you see on the left will be whatever is on your
computer wherever
FileZilla happened to open a folder.
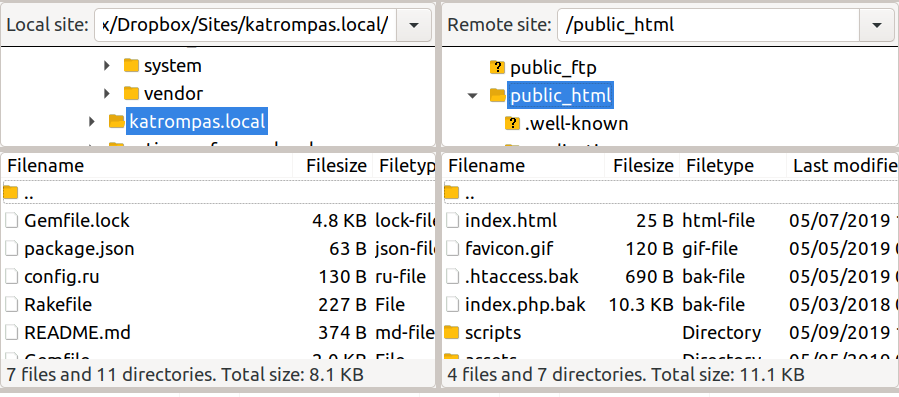
You should be dropped into the root of your account. DO NOT TOUCH ANYTHING ON THIS LEVEL! You will work in the public_html directory and should change to that directory immediately. You can set it as the default directory in Filezilla settings which is smart so you don't accidentally affect files on the root.
-
Now that you have logged in and are in your public_html directory,
you can create a simple “hello world” web page on the server and view it.
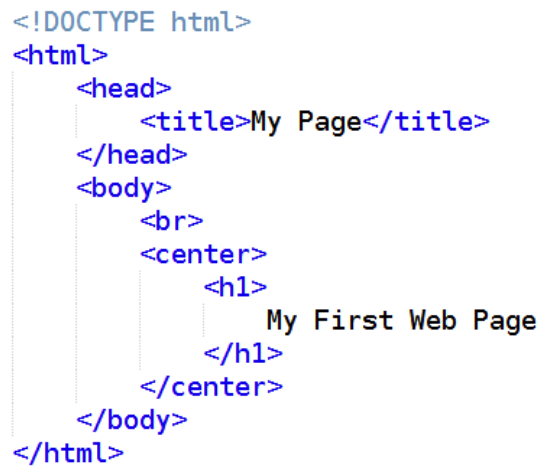
Type the following code exactly as you see it into a text file
and save it as index.html. Then upload it to your public_html
directory by dragging and dropping (or double clicking it) from
the left side of Filezilla to the right. If you did everything
correctly, you can go to your domain name in a browser and
see your site.