GitHub Classroom
Prepare | General Process | Specific Instructions
GitHib Education and GitHub Classroom are services offered by GitHub designed for students and educators to learn and teach version control, and to facilitate training in professional software development practices.
Instructors wishing to set up GitHub education and needing assistance, email me and I will send you a step-by-step set-up guide.
All courses, unless otherwise noted, will use GitHub Classroom for code submission. Programming courses will be expected to follow strict versioning and committing best practices. Other courses which may involve programming, but are not primarily programming courses, will have relaxed requirements which will be explained within those courses.
Prepare
You will need a GitHub account to participate in programming courses. Any GitHub account will do, you do not need a special GitHub account nor do you need the student developer pack, however, you may wish to get access to the free student tools for your own purposes.
Once you are signed up with GitHub, read and complete the tutorial. There is a companion video lecture to walk you through the tutorial.
[ back-to-top ]
General Process
The following is the general process for working with GitHub Classroom. Read this to understand the basic concepts. Following this are specific instructions on completing assignments with this process.
- For each assignment you will be given an invitation link for the assignment, usually one per assignment.
- Accepting the invitation will create a private remote repository with starter files.
- You can get back to all your repos anytime by going to https://github.com/ACC-Computer-Science-semester-year where you replace semester and year with the current semester and year. For example, https://github.com/ACC-Computer-Science-Fall-2020
- You will create a local area on your computer to work (i.e., create a new directory for each assignment unless instructed to do otherwise).
- In that local area you will initialize git, connect your repo, and pull code to your local development area from your remote repo. You will work in your local area, while frequently committing code.
- When you are ready for grading, you will push all your code to the remote repo and submit the link to your repo on Blackboard using the "write submission" area on Blackboard. Sending your link via Blackboard is your signal to the instructor that you are ready for grading. You must submit a link for grading and regrading.
Tips
- While working, you can push as much or as little as you like, however for grading you must push all the code you want graded. All code is graded on GitHub. If it's not there, it will not be graded.
- CHECK YOUR REPO! When you are ready to submit, triple check your repo is complete and up to date. The best way to do this is download your own repo into a new directory and run the application you downloaded and make sure it works. If you do not do this, and if your repo is incomplete when you submit, you will get a zero.
- If you make changes after you submit your link on Blackboard, but before it's graded, that's fine. In that case, you DO NOT need to resubmit your link, just update your repo.
- Once your assignment is graded you will usually have an opportunity to resubmit once for a higher grade. See submission guidelines for details on this.
[ back-to-top ]
Assignment Specific Instructions
The following are the specific instructions/commands which will accomplish the process explained above. Follow these instructions for each assignment.
- Click the assignment link given to you with each assignment. A repo with starter files will be created for you on GitHub. This is your remote repository.
- Once you click the link, you should be taken to your repo on GitHub.
-
GitHub Bug: If you are not taken to your repo,
but instead are taken to a page that says you do not have access to the repo,
this is a bug on GitHub. To fix this follow this process:
- Look in your email for an invitation to the repo. Use it (click the link). That should give you access. If it does not, proceed to the next step.
- Send an email to the instructor. In the subject write "repo access error" and in the body of the email put your GitHub username. You do not need to add any other information. Within 12 hours (usually faster) you will get back a link to access your repo.
- Create a new project directory locally. Make sure this directory does not have another Git instance in its path. i.e. No parent directory and no child directory may also have a git instance.
- Initialize git in your project directory with the command git init
- Add your remote repo locally by using the command
git remote add origin <your-repo-url>
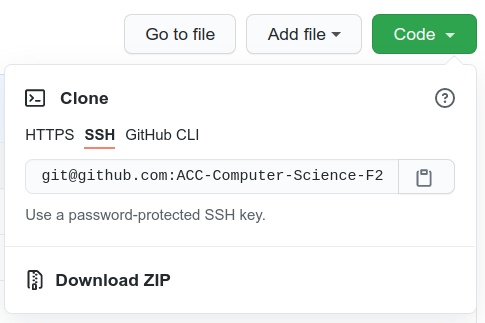
Get your specific url from your repo by clicking the “code” button
in your repo and then using the copy button. Do not clone or download, just click the
copy button so you have access to the SSH link to copy/paste into your git add origin command.
Notice the SSH tab is selected. You need to use SSH.
- Pull your remote code local by using the command git pull origin main
NOTICE: Because of the GitHub change to the default branch being "main" instead of "master" (this is also explained in the tutorial) there is an extra step at this point that may be needed. This is not part of the normal process, but is a "fix" until the "master" label is removed from git.
You pulled 'main' but your local git init may have made a 'master' branch. This will cause a conflict you need to fix now.
Check this by executing git branch command.
If you see this

proceed to the next step to fix it.
Execute the command git branch -M main to
rename the "master" branch to "main".
Check you were successful with the
git branch

Now you can proceed with the normal instructions.
- If it's not already given to you, create or modify the .gitignore file
and/or the README.md.
- .gitignore should ignore everything except your code files and what is needed for submission and grading.
- README.md just needs placeholder text for now, you will typcially complete it at the end of the assignment.
- These will be discussed more in class.
- If you created or modified the .gitignore or README.md, commit them now.
Do this by executing the following commands:
- git add .gitignore (if you added/modified it)
- git add README.md (if you added/modified it)
- git commit -m "initial commit"
Now you are ready to begin working.
- For courses that count as programming courses you must commit your code with each logical and well tested change (this will be graded).
-
To commit files do the following:
- Add the files ready for commit: git add file.ext
- You can also add multiple files: git add file1.ext file2.ext for cases where the same commit message applies to multiple files.
- Commit the file(s) with a message: git commit -m "some smart message"
- Do not use wild cards when you git add. For example never do this:
- git add .
- git add *
- When you want to sync your local code to your repo push it with the command: git push origin main
- When you are ready for grading, do your final commits, do a final push, and submit your repo link on blackboard.
WARNING
Do not change things directly on the GitHub website. You can and should control your repo 100% locally. It is dangerous and bad practice to change things remotely. However, should it happen, here is how to stay in sync and avoid conflicts:- Before you make any remote change make sure your repo is in sync (i.e., do a push).
- Immediately after you make a remote change sync your local code (i.e., do a pull).
- Do not make any other changes or do anything else during that process.
If you break this process, you will have to reconcile the conflicts which is usually so difficult in an academic setting, you will probably have to delete your repo and start over.
[ back-to-top ]