File Transfer Protocol
ACC Student Web servers
If you have a Hostgator server, use these instructions instead.
The following is an example and tutorial for using
FTP and the Filezilla FTP client for use with the
Web Programming courses ITSE 1301, 1311, 2302, and INEW 2334.
-
In the grade center on Blackboard you will see a
column, Web Server Creds. In this column you will
see something like this: u8792225 1a(B#!6a4Ghd
which is your username and password for the Web server
(separated by one space). Don't do anything with this yet, just note it for later.
Note: The password is 12 characters long. Make sure when you get your password from Blackboard you get the whole password. Sometimes the password gets cut off if your Web browser window isn't big enough.
-
There are many ways to transfer files between your local computer
and a remote web server (you are free to use any you like), but the easiest
way is to use the FTP client
Filezilla.
If you don’t have it, you can
download
it,
install
it, and
use it.
If you do not want to use Filezilla, that’s fine,
how you upload to the server is you choice, but
Filezilla will be the tool assumed and supported in class.
Filezilla is already installed in all ACC labs, so if you use the labs, just search for Filezilla in the start menu.
Note: The WiFi on campus may not let you connect to the server on your personal computer. Verify your account works on the lab computers first before sending "my account doesn't work" email.
-
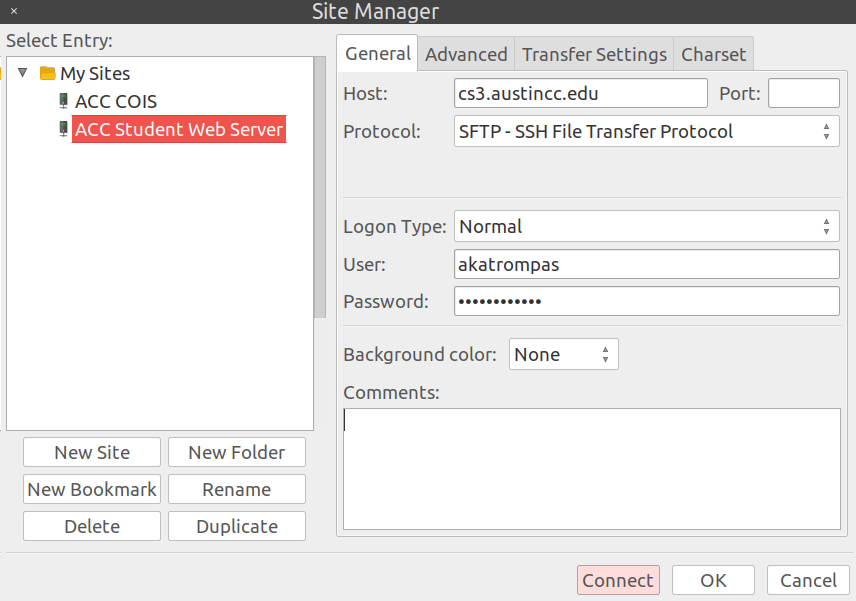
Once you have Filezilla installed and running, open the Site Manager
and set up a connection. On the main menus, choose File-->Site Manager....
Click new connection and enter your information.
It will look similar to this (below).
Name your connection anything you like. I named mine
“Student Web Test” for these instructions.
- Host: cs3.austincc.edu
- Protocol: SFTP - SSH File Transfer protocol
- Username and Password: Use your username and password from Blackboard. Do not copy-paste it. Type it out manually. Copy-paste has sometimes been problematic, so you have to type it out.

-
Once you're sure you have everything set, you can click Connect, and you will
be logged into the server for FTP.
-
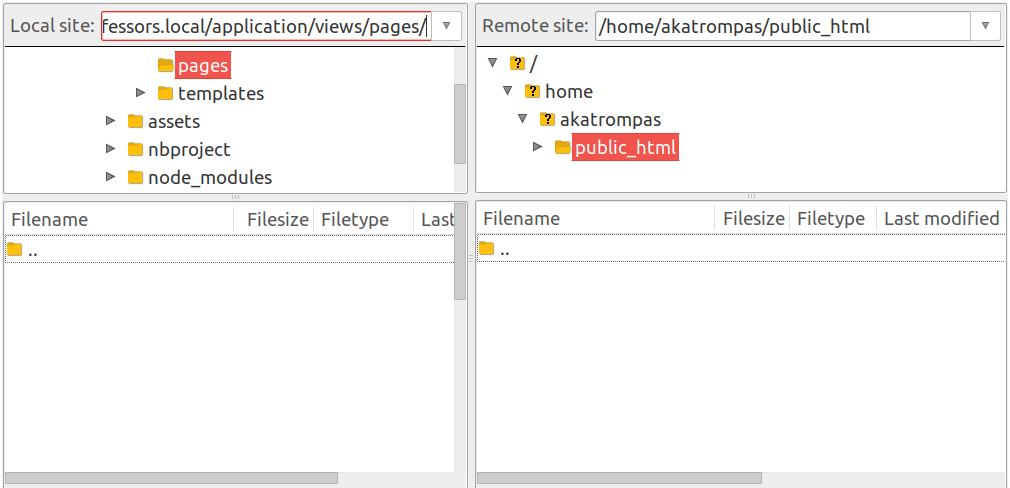
Once you’re logged into the server, you will see your local
files on the left, and the server files on the right. It
will look something like this (below) but may not be exactly the same.
Note that the files you see on the left will be whatever is on your
computer wherever
FileZilla happened to open a folder.

You should be dropped into to the public_html directory on the server. If you are not, you may need to create the public_html directory on the server if it's not already there. The public_html directory should be right under the directory with your username just as you see in the example above with the user name akatrompas. If you don’t see a public_html directory, make one. Right click in that area and choose “Create Directory” and make the directory. Be careful to name it correctly and place it correctly. It must be named exactly public_html and it must be right under the directory with your username.
-
Whether you created the public_html directory or not,
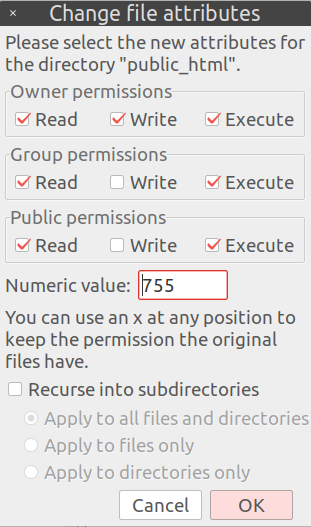
verify the permissions on the public_html directory on the server.
Right click public_html and choose file permissions.
You will see a dialog box that should look exactly like this.
If it does not, check the appropriate boxes and choose OK.

-
Note on Directory Structures: You will be tempted to make a different
directories under public_html for each assignment, for example...
- public_html/coding01/
- public_html/coding02/
- public_html/coding03/
- https://cs3.austincc.edu/~u1234501/coding01
- https://cs3.austincc.edu/~u1234501/coding02
- https://cs3.austincc.edu/~u1234501/coding03
THIS IS NOT RECOMMENDED!
That will work for simple assignments, but it will not work (easily) for more complex assignments that modify security settings. It can be done if you know what you are doing, but if you choose to do that, you're on your own. Instructions will be given assuming your web application is always in the root (public_html). You should always have a clean start in public_html for each assignment.
-
DO NOT TOUCH, DELETE, OR EVEN LOOK AT .htaccess!
Inside your html directory there is a file, .htaccess. It is an administrative file that controls how your server works. If you touch it, you will break it, and break your server. .htaccess files are notoriously finicky and complex. Leave it alone unless you're directed to do something with it (ITSE 2302 students only).
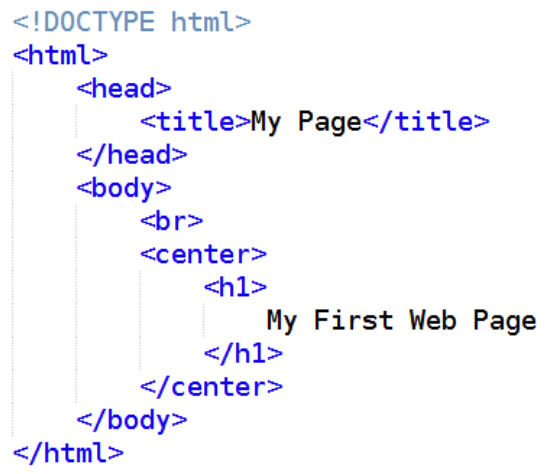
- Now that you have logged in and you have a public_html directory, you can create a simple “hello world” web page on the server and view it. Type the following code exactly as you see it into a text file and save it as index.html. Then upload it according the the instructions above. Then follow this guide to the student server to see your page.
